an initial game strategy that focuses on early acquisition of the Essence of Fluff, written by capi3101.
Rogue Legend, a Flash game originally created by HelpIMadeAGame, is arguably one of the greatest games I've ever played. I can say this with absolute confidence. Why, you may ask? Simple: my wife hates Flash games as a rule, and yet she has played Rogue Legend herself and absolutely loves it due to its excellent blend of resource management, building and adventuring. She loves it enough that, after we discovered this wiki and the information it contains, she came up with the initial ideas behind what we call the "Small Farm Strategy" - a way to maximize the use of the land with which you have at the start of the game. This was further developed into the "Sod Farm Strategy" (which I plan to write up after I'm done with this guide), and then finally to this guide - the Sod House Strategy.
Idea and Concepts[]

The Sod House Strategy - General Layout
Most walkthroughs for Rogue Legend emphasize construction of the Canteen as your top priority at the game's onset. To be fair, this is an absolutely viable way to play the game - without a Canteen, your guy will probably die of thirst on Winter 1, so it's definitely something that needs to be dealt with before the beginning of Winter. The Sod House Strategy, however, takes a different track: the idea is to get to where you can craft the Essence of Fluff before the onset of Winter. You can't buy the Essence of Fluff - you must craft it. And to craft it, you need to have 6 units of Medium Wool, which in turn means that you'll need a Sheep to produce it. According to data elsewhere on this wiki, it takes 33 days for a Sheep to begin producing Medium Wool, and given a three day wool production period it will take 18 days for it to have produced enough Medium Wool to craft the Essence of Fluff - a total of 51 days from the date of purchase, assuming the player feeds, talks to and brushes the Sheep every day without fail. What that means is that if you want the Essence by Winter 1 - and trust me, you do - you have to have your Sheep bought by Spring 9 (yeah - that early). All of which means that you are going to be required to put up a serious outlay of cash in a part of the game wherein you haven't got a lot of money...
Believe it or not, it IS possible to get the job done - hence the Sod House Strategy.
What the Sod House Strategy does is to have you build an efficiency combination house/barn for your guy and his Sheep as quickly and as cheaply as can possibly be managed, while at the same time attempting to maximize the amount of money you can generate for your farm from the resources you have available to you at the onset of the game. The strategy uses these elements:
- Scavenging as much as you can from the burning village.
- Using Cliff Blocks for walls.
- Purchasing building materials from the Materials Store.
- Selling things you might not think about ordinarily.
- Manufacturing Chests, Fishing Poles and Wooden Swords.
- Planting Saplings.
TL, DR: The steps in this guide will get you the Essence of Fluff (one of the two critical items for making Winter less excruciating) as early as possible.
The strategy in its entirety is worth the read-through, especially if you're playing the game for the first time. However, for those of you who'd prefer the short version or who have gone through the game before and know a little bit about what you're doing, you might check the "In Summary" section at the bottom of this article.
The article assumes you're doing this in Year 1, and so doesn't include the year explicitly in the discussion. So, when it says something like Spring 1, what's meant is "It's the 1st day of Spring in Year 1." (The fact that the guide is talking about Year 1 should be implicit, but I've been asked about it in the past, so I've added this little blip just to be clear about it. Capi3101 (talk) 16:32, June 22, 2016 (UTC))
In the Beginning[]

Spring 1: Saplings - a Calendar that's not a Calendar.

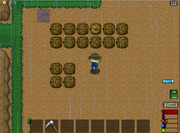
Here's how things should look in the early going. Note the positions of the Chest, the Stone Floor Block and the positions of the seeds in the first crop bed


Hammering out the lake. Water blocks are useful - and profitable, too.


Here's where you want your water block. This is how things should look after the first seven steps of the Sod House Strategy on Spring 1.


Chests don't give you a lot of extra profit over the Stone and Wood needed to make them, but they do make $5 over the raw materials themselves.


Spring 2: A full-sized bed of crops. Even when your farm gets bigger, this is about the size and shape you want for your crop beds.


This is an example of a particularly bad price for Hay Seeds. The correct answer is "Nah".


The water block is good for more than just drinking out of.


You'll use Cliff Blocks as the walls of your house - which is what will make your house a "sod" house.


Spring 3: When you consider the material cost of an Umbrella - adding in the cost of an Anvil and Tinker Table as well - it makes WAY more sense to purchase an Umbrella.


An example of a MUCH better deal for Hay.

When you've got enough seeds planted, start a second crop bed.


Hay should always go in its own bed, so you don't wind up later whacking down a crop you shouldn't with a higher-end Sickle.


Initial construction of the Sod House


More sod walls in place.

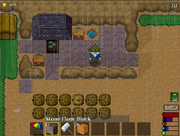
What the sod house looks like with the "walls" and most of the floor in place


The doors of the Sod House in their right places, with what roof there is invisible.


The final disposition of objects in the Sod House after Spring 3. These will move around a little if you go forward with the full Sod Farm strategy.


Part of the Sod Farm Strategy, these floor blocks mark out where your crop beds will go and where your "path" needs to be - seeds go in the interior of the blocks. You leave the "paths" as dirt for now so that weeds will still grow there. Later, when you've got a bigger farm, you can replace them with proper paths.


Spring 4: It's not about how it looks, but whether or not it works.


Where the Fences will go for the Sheep Pen in the Sod House. Note the position of the Trough as well.


Spring 9+: Nine days equals nine planted Saplings.


When you can, purchase a Sheep. Like any other Farm implement though, you want to wait until you have a good deal.


This is why you left a gap in the fence earlier. Without it, you wouldn't be able to put the Sheep in its pen.


A Sod House with all of its occupants finally moved in.


The Anvil must be placed in an enclosed space; until you can expand, just block the side doors.


A sample grove - part of the Sod Farm Strategy.
After you get shoved into the fireplace by your doomed mother, you want to make sure you leave the burning village carrying the following items:
- The Wooden Sword (pilfered off a corpse in the village center)
- Axe (conveniently placed right by the Flimsy Hammer)
- Hammer (pilfered from the first Knight you fight, right after you get the Wooden Sword)
- A Chest (located to the north of the village exit - and easily missed if you don't take the time to look around)
- A Hoe (located inside the Chest, which you'll have to take out of the Chest in order to Hammer it out and pick it up)
- 2 Doors (there are actually harvest-able doors all over the village; just hammer them out and pick them up. Alas that you only have room for two. Try not to burn yourself when you go to pick them up...)
- As much Stone as you can find.
- I've found as much as 45 extra stone from the burning village. The key here is to scour the village for Stone, and when you pick up the Flimsy Hammer to collect the initial batch of eight Stone to make sure you craft three - and only three - Stone Floor Blocks to escape. Don't get Path Blocks mixed up with Stone Floor Blocks - you want the Stone Floor Blocks, which cost only 1 Stone to craft (whereas Path Blocks cost three stones, making the Stone Floor Blocks far more economical).
You might wind up with Berries in hand as you scavenge out your doomed home. If you do, either drop them or eat them - you won't have the space you need to carry everything else otherwise. Don't leave the village until you've gathered the materials listed above; if you do, consider starting over.
Spring 1[]
One Year Later, the tutorial section of the game begins. You really can't do much here other than follow the instructions, but there are a few things you should make sure to do while the tutorial is ongoing:
- Before you start weed-whacking for Seeds in your lawn, go ahead and stow the Sword in the Chest provided. Craft 34 Stone Floor Blocks.
- Take one Stone Floor Block and place it one square up and two squares to the right of the path to the village. This initial Stone Floor Block will be used as a marker to measure out the right size of the crop beds you'll be making and the eventual size of your house (and it will be referred to here as the Marker). If you have to smash out a Stone, pull up a Weed or chop down a Tree in to place the Marker, so be it: it MUST go there.
- Place another Stone Floor Block two squares up and one square right of the Marker (this should also be one square below and one square to the left of the Door to your house), and then place the Chest you brought from the town on top of it. This will be the final position of this particular Chest. Once it's in place, go ahead and store the remaining Stone Floor Blocks in this Chest for the time being - we'll need them again on Spring 3. Place the Doors you brought from town in this Chest as well.
- Now, fell a Tree. Gather the Wood and place the Sapling generated one square above and one square to the right of the bottom left-hand corner of the farm (again, clear out the space if first if you need to). You'll plant a Sapling each day - this will help you keep track of what day it is until you can afford to buy a Calendar for yourself later on in the game. Go ahead and look for Seeds by weed-whacking your yard. You'll find a packet of Radish Seeds in the Chest provided; you can get these out to move things along a bit.
- When you have four seeds, plant them in a 2x2 block one square below and one square to the right of the Marker. Craft a Watering Can with it when prompted.
- As you clean up your yard, you'll probably get a Plant Fiber. Fashion a Fishing Pole for yourself to keep. Stow it in the Chest by the Door for now. Also, keep all the Saplings you gather for the time being.
- When you get sent off to find food, grab your Sword and go to the Bat Screen (a.k.a. Wilderness 1). Grab yourself a couple of Berries from the screen. While you're there, use the Hammer and smash out the entire pond in the center of the screen. Go back to your farm, and place one Water Block to the right side of the Chest that came with your farm. Place another block in the Chest by the door - you can keep this one as a portable water source until you can craft the Canteen later on. Drink up like you're prompted to do, and then when you're prompted to put something in the Dropbox, put the remaining Water Blocks in there. They'll make you a healthy little profit when 18:00 rolls around.
- When you get sent out to collect Ore, just grab one Copper Ore unit. Do not do anything with any Cliff Blocks you may happen to collect in the process; just take them back to your farm and store them in the Chest by the Door. You'll use these Cliff Blocks on Spring 3.
- At this point, you should be being prompted to sleep; don't do that just yet. There are a few key events you can watch out for that'll let you know what time of day it is - your Dropbox is emptied out and you get paid at 18:00, the screen turns darker at 19:00, then orangish at 20:00. It will slowly start fading to black after 21:00 until true darkness finally sets in at 22:00, at which point your guy will become stressed (and start getting sick) if he's still awake. You always want to stay awake until sometime between 21:00 and 22:00; your guy will wake up about eight hours later, so this will wake him up sometime between 5:00 and 6:00 the next day. So with that said, spend the rest of the day cleaning up your farm yard. Craft a Sickle for yourself when you have the materials you need. Use any Wood and Stone you collect to build Chests. Keep a single Chest for yourself but sell off the rest - you're trying to make money some desperately needed money for the next few days.
- When you do finally decide to go to sleep, be sure to grab your Sword first. You'll want to sleep with your sword in your hand for at least the next few days, until you can build your house up around your Chests.
Spring 2[]
- After you've slept overnight, open the journal as you're prompted. That will conclude the tutorial.
- Plant a second sapling above the one you placed yesterday. Once that's done go weed-whacking.
- Plant any Seeds you come across. Expand the initial bed of Crops to no more than 6 squares across (to a 6x2 area maximum).
- You'll spend most of the day finishing the process of cleaning up your yard. At some point during the day, go to the Farming Store and check the price of Hay Seeds. If you can afford it, buy Seeds; if not, you can wait until tomorrow to try again. Try to get a good deal if you can; preferably, you want Seeds that are both well below market price AND ones you can afford - expensive seeds will cut into the revenue you need to buy other things. You only need to buy one packet at this point, but if you want to move on to the Sod Farm Strategy later and would like extra Hay to support additional animals, grab three packets - 27 units of Hay will support up to ten Sheep/Cows (and you're shooting for five of each in that strategy).
- Make Chests, Fishing Poles and Wooden Swords as you go, putting them in the Dropbox to sell. Remember to keep a Fishing Pole for yourself - with your watering hole, you've got a ready source of food and water. If your guy gets tired, hungry or thirsty as he works, grab the pole and fish for a bit; your fatigue will go down while you wait. Even if you don't catch fish, what you'll pull up will be generally useful...
- If you finish cleaning up your yard before the end of the day, grab your Cliff Blocks and go to Wilderness 1. Hammer out Cliff Blocks until you have 21 of them. Once that's done, spend any other time you've got that day fishing - a few spare fishes today will save you some time to build your house tomorrow. If you want to go for having enough Cliff Blocks to build your Barn, you'll want another 52 Cliff Blocks - or 73 total - which is doable but will wear your guy out pretty easily. I myself have never done it in a single sitting.
Spring 3[]
- Begin by weed-whacking, planting additional Seeds and watering them (if necessary - about half the time it rains on day 3). Don't forget to plant your Sapling.
- If you have to, begin a second crop bed below the first one. Be sure to leave a space between the crop beds.
- Hopefully you can start growing Hay today. If not, it's not a big deal - but you want to be growing hay no later than Spring 6 if you want to have some Hay to feed your Sheep on Spring 9.
- After you've crafted a few items to sell (you'll might have to visit Wilderness 1 or even Wilderness 2 to find materials with which to work at this point - just don't take too long doing it), it's time to build the Sod house. Grab your Cliff Blocks and your Stone Floor Blocks.
- Begin by setting three Cliff Blocks in a L-shape just above the Marker. The Chest by the Door should fit snugly around those blocks.
- Leave a gap, then place two more Cliff Blocks in between your house and the Dropbox.
- Leave a gap, then put down six cliff blocks in a row to the right of the initial L shape. You should extend two spaces past the end of your crop beds.
- Leave a gap, then build northward from the east end of the cliff blocks you previously placed until you reach the north end of the screen.
- Then from there, place Cliff Blocks along the northern edge, working left towards your house. You'll want to go ahead and replace the back "wall" of your house (the three House Wall Blocks there) with Cliff Blocks as well. Do not use the Hammer to get rid of the Wall Blocks; you don't want to take out the Roof Blocks overhead in the process. Just place the Cliff Blocks where they need to go and you'll automatically pick up the Wall Blocks in the process.
- Now, grab your Stone Floor Blocks and start filling in the interior space you've created with flooring. Replace the remaining Wall Blocks of the house with Floor Blocks. Again, don't Hammer out the walls - you want to leave what Roof you have in place. Place Floor Blocks in the gaps you left in the Cliff Blocks as well.
- Place the Wall Blocks in the Dropbox - that's your drop for today along with any Chests/Fishing Poles you've fashioned. Keep any Dirt Blocks you gather; we'll use them to make parts of the edge of the Farm capable of growing Seeds.
- Now, smash out the Door, grab it and grab the two extra Doors you brought from town. Place one in each of the gaps you've put in the Cliff Block walls.
- Next, smash out the Bed and move it one square to the right of where it was. Smash the Water Block and move it over to the upper left-hand corner of the enclosure. Go ahead and put down a Stone Floor Block in its place.
- Now, smash the Chest that came with the farm and place it between the Water Block and the Bed (empty it out first if necessary - you shouldn't have anything stored in there at the moment). Grab the third Chest (the one you saved for yourself on Spring 1 - which you remembered to do, right?; if not, craft one) and place it one square below the upper right-hand side corner (just above and to the left of the right-hand door). This will finish out the initial disposition of the house.
- Congratulations - you have the walls and the floor of your Sod House built; you'll be purchasing your roof blocks later.
- You can take your remaining Floor Blocks and use them to mark out the positions of your crop beds. You'll want five total areas set aside for crop beds for now - north, center, southwest, south and southeast. These will stay here to support your farm as it grows (i.e. as you go from Sod House to Sod Farm) and leaves the remaining space in your yard for a barn later on. Sell any Floor Blocks you don't use at this point (such as the Wood Floor Blocks that came with your house.
- You've probably used most of the day to build the house, so spend the rest of the day fishing. Your dude's probably pretty hungry and thirsty by now.
Spring 4[]
- Begin the day with the usual activities - weed-whacking, planting a Sapling, planting any seeds you find after you go weed-whacking and watering crops.
- Today begins the process of picking up the rest of the supplies needed to support the sheep. Grab your Sword, Hammer and Axe, then go to town.
- Stop by the Ranching Store first. Look for any good deals on a Trough, Brush and/or Shears. Purchase any of these items that you can afford. If there are no good, affordable deals, walk away - you still have a few days before you NEED any of this stuff and can probably get a better deal later. The only farm supply you absolutely have to have before Spring 9 is a Trough (and the Hay to put in it, of course) - when you get the Trough, place it immediately to the left of the upper-right hand corner of your House (one space above and one space to the left of the third Chest). The Brush is important for making the Sheep happy enough to begin producing Medium Wool, but if you can't feed it first it won't live long enough anyway. The Shears are the lowest priority item you have to acquire - you can have the Sheep before you have the Shears.
- If you still have any money left over after you go to the Ranching Store, go to the Materials Store and look for deals on Roof Blocks. If you can get a good deal, great - you'll want to buy 30 Roof Blocks Any roofing materials will do - this strategy is not about aesthetics, but function. If you wind up with an eclectic mix of House Roof, Wood Roof and Red Roof Blocks, so be it - the important thing is a roof over the head of yourself and your sheep. Again, if you can't get a good deal, walk away - you still have time.
- Place the Roof Blocks over your house as you get them (preferably later in the day, after you've done any crafting for money-making purposes that day.
- Spend the rest of the day making Chests, Fishing Poles and Wooden Swords. Be sure to get them in before 18:00. Favor building Chests over Fishing Poles, and make Wooden Swords only if you run low on Stones and Plant Fibers.
- Fish and gather Berries to keep your guy happy, active, and generally not dead-ish.
Spring 5 through Spring 8[]
- By Spring 5, you've hopefully got Hay going.
- Your activities on these days are pretty much same as Spring 4 - check the Ranching Store for any tools you still need first, then the Materials Store for roofing materials. Once you've finished getting what you need from these stores, you don't have to visit them again. Should you acquire everything and still have a few days, consider visiting the Ranching Store to purchase the Sheep early (but be sure you can feed it before you do this).
- If you've been making Fishing Poles, your Plant Fibers may be getting scarce at this point. Go ahead and proceed into Wilderness 2 or even Wilderness 3 if you must for more (but NO further; aside from not usually being able to make it back before 18:00 without a Recall, it's generally a bad idea to fight anything stronger than a Slime with a measly Wooden Sword).
- If you can't find any Plant Fibers (or are not confident in your abilities to find more), just harvest Wood and Stone/Cliff Blocks and make Chests - the profit margin is higher anyway and it's better than just selling the materials outright. Alternatively, you can focus on making Wooden Swords - they require fewer overall materials and still have a better profit margin than just selling the wood outright. Above all, try to have SOMETHING to put in the Dropbox each day.
Spring 9[]
- After Spring 8, don't plant Cabbage seeds - just store them. The Cabbage won't finish growing before the season ends.
- Hopefully by now you've got your supplies collected and Hay is growing. Today, go to the Ranching Store and see if you can afford a Sheep. If so, congratulations; if not, don't panic. Just keep on as you've been doing for the last few days until you can purchase your Sheep. Try to have the Sheep bought no later than Summer 9 - otherwise you're either going to be staying indoors all Winter long or spending a lot of cash on Medicine.
- Once you have purchased your Sheep, place it in the upper-right hand corner of your House, nestled between the Trough and the Chest - this is it's "pen", and those two objects will keep it from moseying about your House and getting in the way at a bad time. You want to talk to your Sheep and brush it each day. Get a Brush as soon as you can (if you don't have one already). Don't worry about getting Shears right away, but get them as soon as you can afford them so you can start harvesting Small Wool for profit.
- With a Sheep in its pen, the Sod House strategy has reached its conclusion - now your priority shifts to the construction of a Canteen. When you can craft your Anvil, place it immediately to the right side of the Trough, and then place the Tinker Table below it once you've gathered the necessary materials - with the third Chest placed where it is, you have a little "workstation" set up there, which you can use to take care of your Sheep and craft new items without having to move about too much.
Spring 10 and Beyond[]
- After Spring 9, don't plant Pea seeds - just store them. The Peas won't finish growing before the season ends.
- On Day 10, you usually get the request to rate the game; use that notification to keep track of the days if for some reason you forgot to plant a Sapling on any given day.
- If you've been faithful with planting the Saplings, the Sapling planted on Spring 1 should now have grown into a fully-blossomed tree. So, after planting a tenth Sapling on Spring 10, grab the Axe on Spring 11, cut down that first tree and re-plant the Sapling it produces in the same spot. Either sell the Wood outright or make goods with it. If you've faithfully planted the Saplings, you should have six units of wood reliably available to you each day from now on, and you should still be able to easily tell which day it is based on which tree you have to chop down that day, which will work as a time-keeping method until you can acquire a Calendar.
In Summary[]
To summarize, here are the basics:
- A Sheep bought by Year 1, Spring 9 can produce 6 Medium Wools before the first Winter - this is enough for essence of fluff.
- Rushing to fulfill this goal basically entails selling a lot of things to raise revenue quickly. Nothing else matters.
- Using Cliff Blocks (sod) for the walls of your house is key. Use Stone Floor Tiles which cost 1 Stone to make, and use them in areas where you need access all the time. Stone based Roof Tiles use one less resource total and saves on Wood, which can be used to craft Fishing Rods (best value for money items in the game).
- Grab a Water Block from the first wilderness map and put one in your House somewhere - drink from it to quench your thirst and fish it to get food and reduce fatigue. Keeping it inside gives you something to do on a rainy day if you don't have an Umbrella and you want to keep from getting too sick.
- Money-rushing strategies include:
- Making sure you start with the full start-up as listed above.
- Mining tonnes of sod (quick and easy) and selling any you don't need (more than 73 Cliff Blocks, or more than 52 after your Sod House is built).
- Selling expensive seeds (Cabbage and Broc) that you find.
- Making and selling Fishing Rods (very good money, but burns through Wood and finding Fibers can get tricky after a while).
- Making and selling Chests (good money, but consumes resources, including Stone which is limited if you sell off all your Cliff Blocks).
- Making and selling Wooden Swords (okay money, only consumes Wood - which if you follow The Sod Farm Strategy is not a big deal).
- Selling lots of Leather from hunting monsters - you also getting money from hunting monsters and though the amounts are low they do add up.
- Selling Berries, Fish and any food you can spare, keeping just enough to stay fed until your Sheep get set up.
- Selling your Wooden Sword if you're fortunate enough to get a Copper Sword dropped, and then selling any other Copper Swords dropped.
- Selling any resources you judge are in excess (in the early going, this is usually Leather).
- Not getting Shears until later is ok; you'll miss out on a bit of Wool revenue, but if that's the price you pay for setting up your Sheep on time, so be it. A Trough is essential. Not having a Brush will more than halve the number of Medium Wools you get so get it ASAP, preferably before you have your Sheep but within a few days after buying the Sheep is okay too if you want to wait until you can get a good price for it.
You want to make sure you have more than enough Hay to get you through the Winter. Once that's sorted out, you can follow whatever strategy you want - the essential part of the Sod House strategy is over. You can try to get additional Sheep if you wish, but once you have at least one you can start focusing on other priorities (such as building a Canteen and Backpacks).
Concluding Thoughts[]
That brings the Sod House strategy to a close. If you like, once you've got your Sheep and are beginning to collect Small Wool, you can begin the process of expanding the house with The Sod Farm Strategy, which is designed to maximize the use of the land with which you have at the start of the game without paying off the farm debt. It allows you to do this while fulfilling several of the game's achievements (such as collecting all of the animals) while preserving as much space as possible for weed-whacking.
Well, that's all I have for now. Best of luck to all of you in your farm building.

|
| Fall 16 with the Sod Barn built - and victory about to be achieved... |