an early game strategy designed to maximize the amount of space available to the early player, as written by capi3101.
This page is incomplete (but still usable). Capi3101 (talk) 17:59, June 22, 2016 (UTC)
As I mentioned in my earlier article, the Sod House Strategy, the Sod Barn strategy was originally born out of my wife's attempts to find ways to maximize the amount of space available to a player at the start of the game while still allowing them to make significant inroads into finishing up the game's achievements - a philosophy we simply called the "Small Farm Strategy". The transition to the Sod Farm Strategy can be attributed to contributors to the Tips and Tricks page on this wiki, who mentioned that "You can make a "house" with just a roof." and "Buying certain items from the shop is more cost effective than crafting, specifically for flooring, roofing, and house walls (which you don't necessarily need)". A simple experiment took place thereafter to verify these statements; Cliff Blocks were utilized for walls and the floor was left as simple Dirt Blocks, with Roof Blocks crafted on the initial attempt. Lo and behold, the experiment was a success and the Sod Farm Strategy was born. Later, when we had discovered the existence of this remarkable tool known as the Essence of Fluff and calculated based on the data at hand on how early you'd have to get started with the process of crafting it prior to the first winter, we refined the initial part of the strategy and the Sod House Strategy was born.
The original intent of this document was to create a full walkthrough of the game - the idea that you should do X on this day, do Y on that. In the time that has passed since I first mentioned the Sod Farm Strategy on this wiki, however, I've started enough games to realize that you can't really do the same things the same way every time. So instead of a full-on walkthrough, this page will include some tips for intermediate players, strategies that have been tested repeatedly and have worked every single time. This page will begin with the assumption that you've followed the Sod House Strategy - that you've already set up for yourself a 21-square house with Cliff Blocks for walls, Stone Floor Blocks for floors and whatever you were able to buy on the cheap for a roof, that there are a three chests inside and a "feeder box" pen made with a Trough and a Chest, with a Sheep inside it. If you haven't done that yet, go back to The Sod House Strategy page and start there; come back here when that's taken care of.
Ideas, Concepts and the Basic Layout[]
The Sod Barn Strategy - General Layout
The principle motivation of the Sod Farm Strategy is to leave as much of the available land on your farm for weed-whacking while still being able to fulfill the animal-based goals in the Progress Journal. Simply put, in the early part of the game you need to be focused on building crucial tools and equipment you'll need in order to A) Survive the Winter, B) improve your farm's productivity and C) begin filling in the Progress Journal. These three goals dovetail with one another quite nicely as it turns out - by focusing on improving productivity, you can start to afford more and better tools, making the job of filling in the Progress Journal that much easier, and make enough money where - if push comes to shove - you can afford to buy food from Town. Water during the Winter is a different story - you must have the Canteen, and you must craft it - but everything else is pretty much cake.
The Grove and Wood-Based Economy[]
Wilderness 1, before and after everything is harvested and the grove planted.
A typical Bat Trap, in Winter
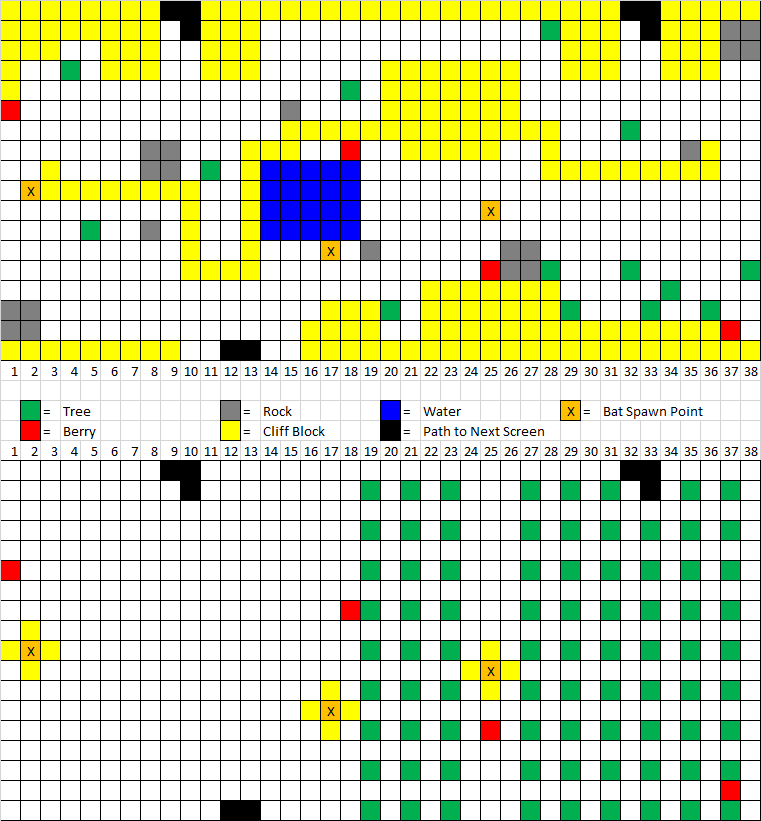
Raising a Barn will be pretty expensive, and if you've followed the Sod House Strategy you'll probably be pretty short on resources by the time you're done building the house, but you'll still need to make money pretty quickly. Since you still want to be making money for animals, building materials and so forth, and since your available working space is limited, you should consider making use of the first wilderness screen (the Bat screen or Wilderness 1). It's free space, and while Bats are still capable of doing damage to your guy if you let them, they're nothing a well-timed stroke with a Copper Sword or better can't handle. You're likely to render that screen devoid of relatively non-renewable resources (20 Water Blocks, 16 Stone, 14 Saplings, 84 Wood and 223 Cliff Blocks) while setting up your farm anyway; this suggestion, in fact, assumes that you've done just that.
It can be a pain to have to deal with Bats every time you go to chop down your trees, and depending on whether or not you've crafted a Backpack for yourself or not you might not be able to juggle everything your guy is carrying. Fortunately, it is possible to set up "Bat Traps" to contain the little buggers from getting in your way. It just depends on your ability to find the points from which they spawn, and that's an easy thing to do given that Wilderness 1 is always the same for every build of the game. There are three points on the Wilderness 1 screen that spawn Bats, and they are located:
- Four squares down and one square to the right of the left-most set of berries.
- On the south side of the pond, one square to the left of the bottom-right corner (or five squares below and one square left of the second left-most set of berries).
- Three squares above the third left-most set of berries.
To know if you've found a spawn point, try to set a Cliff Block down in the position - if you've found one, the game will not allow you to place an object there. All that you need to do once you've found a spawn point is to set up a Cliff Block on each of the adjacent ordinal squares (above, below, left and right of it). Instant Bat Trap. What do do with the Bats once they're trapped? Harvest them for resources, of course! A slain Bet will yield up money at a minimum, along with occasional Leather, Meat and sometimes good trade items (like Housing materials) or useful tools (like a Copper Sword or Health Potion).
Incidentally, the Bat Trap strategy works on other Wilderness screens as well, but since they are always randomized, you will have to spend some time and energy hunting for the spawn points. In general, when you first see a creature, kill it and then go to where you first saw it. Begin putting down Cliff Blocks where you first saw it and begin working outward in a radius around that point. When you finally find the right spot, the game won't let you put a Cliff Block there. You can then build the trap and re-collect any other Cliff Blocks you put down in the process. The downside to this is that it can make your guy tired fast. But, the upshot should be obvious - being able to travel all the way to Wilderness 8 without having to worry about a run-in with a serious heavy like a Floating Eye or Ghost is nice.
Once you've rendered the screen safe from Bat attacks, there are two main ways to make use of the space. The primary way is to set up a "grove" on the screen. If you've been chopping trees, you probably have a good-sized collection of Saplings built up (eighty or so); rather than sell them, plant them in the Wilderness 1 screen. Start just to the southwest of the northeast corner and plant a row of them going southward, skipping a space in between (in general, following the "after" image in the diagram above). You should wind up planting nine Saplings. Continue in the same pattern each day for the next few days until the first Saplings you plant start becoming Trees. Leave a space or two in between columns of trees; I recommend two spaces. Don't worry about planting over where Berries spawn; just like with spawning points, the game won't let you build where it generates Berries. When the Trees blossom, chop them down and re-plant the Saplings. You'll have a steady supply of about 50-60 Wood coming in daily, and at that point any extra Saplings can be sold - they don't make great money at only $5 a pop, but they won't be taking up valuable storage space in your Chests either. You don't want to harvest and re-plant more than about nine saplings per day, though - much more than that and your guy will wear himself out picking up all the Wood this strategy generates (especially if you don't have a Titanium Axe or better; obviously, if you go with this money-making strategy you're going to want a Diamond Axe as soon as you can afford one).
What to do with all that Wood? There's several possibilities, of course - not the least of which is eventually using it to turn your home into something that doesn't resemble a big clot of dirt without having to pay for it - but the big thing you can do with it is manufacture goods for sale. Fishing Poles, Chests and Wooden Swords will still turn a handsome profit in this part of the game, and you still want to be making money, especially if you want to populate your barn quickly. If nothing else, fill the Dropbox with Wooden Swords as often as you can - they raise a decent profit (~$1,000 on a daily basis, enough to buy better tools and animals over the course of a few days) over the cost of the Wood alone and they only require the Wood itself to craft.
Probably the best part about building a grove is that it's something you're free to ignore completely once your economy really cranks up. Unlike crops and animals, Trees don't care if you don't come by every nine days to come chop them down, and there will come a point where the amount of work you're doing tending to the grove will start interfering with the other things you'd like to do with your day. At that point you can completely walk away confident in the knowledge that if you ever need to raise a few thousand bucks quickly, the Trees are there waiting to be harvested...
The other way to make use of the Wilderness 1 space? If you need additional space for crop beds, plop down a few Dirt Blocks in Wilderness 1. You'll be able to till the soil, plant plants and grow things there just like you would on your Farm proper...though even once the Barn is in place, you shouldn't need to do this with the space you have unless you're seriously going gung-ho with a particular cash crop, and once you've paid off your farm debt, you should have more space to do this than you really need.
Raising a Barn[]
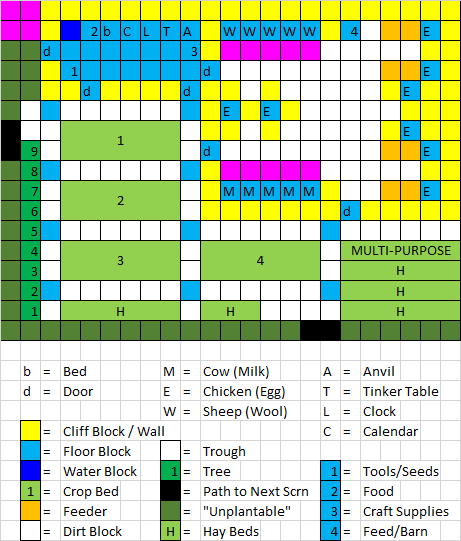
Assuming you built the Sod House according to the instructions and once the Sheep is inside it, you'll need to collect the following to raise the Barn itself:
- 52 Cliff Blocks
- 20 Stone Floor Blocks (The diagram shows 21, but you don't really need the one underneath chest #3; you DO however need the ones indicated under the animals).
- 3 Doors
- 125 Roof Blocks of any kind.
As with the Sod House Strategy, we're going for function, not aesthetics. The amount of Roof Blocks you need to purchase will run you anywhere from $1,300-$5,850, money you might not have in the early going (but would take only five or six days to raise with a functioning grove...). Obviously you want to try and get a bargain on the Roof Blocks if you can. It's also going to take a lot of energy out of your guy to put up all that roofing. It's alright if you have to put up the walls of the barn and get the roof up later, and then spend another day or two or three days putting it all up. The key thing about the Barn is that it's not really a top priority early on in the game - you still want to be spending more of your time weed-whacking, planting, harvesting and selling off any Small Wool that you're getting from the Sheep, not to mention going out and getting the materials you need to construct your Canteen (for which you will ultimately need 13 Iron, 2 Plant Fibers, 4 Leather, 4 Copper and 8 Wood to build; getting the Iron while you've probably not got anything better than a Copper Sword is what's going to make that tricky).
Once you do have the barn in place, though, you'll obviously want to populate it. Before you do, you'll want to purchase nine additional Troughs and eight Chicken Feeders, which will give you the capability of supporting five Sheep, five Cows and eight Chickens - enough to complete those achievements in the Progress Journal. You should have Hay production going for your Sheep already and a Brush and Shears, so the only other farm implement you'll need is a Milk Pump. You'll want the Milk Pump before you buy your first Cow, since Cows (unlike Sheep) will give you milk right away and will produce it daily. Even if they're just producing Small Milk, five Cows in the barn can net you $500 each day if you sell it off. It will take you about three full seasons to recoup the cost of purchasing the Cows, but it does add up. You'll need to ramp up your Hay production to 27 blocks worth; you'll need it when you fill your Barn with animals, and that amount will just barely give you what you need to produce enough food for all of those animals for a full year (including the Winter, when you can't grow Hay). Technically, you can make Chicken Feed on the Anvil by growing Corn in the Summer, but growing enough for eight Chickens for an entire year will entail backbreaking work, and will ultimately leave you with a significant financial deficit - it far more cost effective to just buy your Chicken Feed from the Ranching Store, even if all you can get for it is a crappy price.
You do need to go ahead and add Floor Blocks under your livestock. This prevents the game from trying to populate the ground underneath your animals with Weeds overnight; when this happens, the game moves the animals and they'll break containment. Trying to maneuver a Cow or a Sheep back into its pen is difficult and time-consuming - time that's better spent on more lucrative activities. If the aesthetic of making cloven animals stand on cobblestones bothers you, you can buy (or better yet craft from 2 Dirt Blocks) Grass Blocks instead; they'll also do the trick. Just don't leave Dirt underneath them.
Starting from the Sod House, here's how you raise your barn:
- Begin with your Cliff Blocks, Floor Blocks and Doors in hand. Run a line from the existing north wall of your Sod House all the way to the upper right corner of your farm, collecting Dirt Blocks as you go.
- From the upper right corner, run a line of 10 Cliff Blocks along the right side of your farm. When you're done, you should be two spaces above the Multi-Purpose half-Crop Bed in the diagram, leaving a single space path that will let you water and harvest the plants in that bed.
- Place four Cliff Blocks in a line to the left of where you put the bottom-most Cliff Block along the east wall, then put down a Floor Block to the left of that line. Put another seven Cliff Blocks down in a row to the left of that. The last Cliff Block in this line should be one space north and one space east of the Floor Block marking the northwest side of Crop Bed #4.
- Place two Cliff Blocks in a row above the last block you placed. Place a Floor Block above these Cliff Blocks, and put two Cliff Blocks in a line above the Floor Block. These blocks should connect to the Cliff Block in the lower right corner of the existing Sod House.
- Hammer out the Cliff Block immediately to the left of the lower right-hand corner of your existing Sod House. Put down a Floor Block in its place, and then place the three Doors into the gaps in the Cliff Blocks (where you've put down the Flood Blocks). Congratulations, you have the walls of your Barn up, but it's not an interior space until you've got the Roof up; if you have to wait a few days before you can get the roof up and you get attacked in the meantime, you might still find Bats and Bees lurking around inside the space, so be careful.
- Start getting the Roof up. Take whatever time you need to do it. If you've do the entire job of setting up your barn in one setting, your guy will most certainly be tuckered out well before he finishes; that's fine. Go fishing and/or munch some Berries if you need to to cool off a bit.
- Next, we'll begin the process of constructing
feeder boxesstalls for the animals. Starting in the lower left-hand corner of the nascent Barn, drop Floor Blocks in a row going towards the right, and then put a Cliff Block one space to the right of that (just above and to the left of the Door there). Move over to the upper left-hand corner of the barn and repeat this same pattern. - Now comes a complicated bit. Starting in the upper right-hand corner, place a Floor Block, then put a Cliff Block below it. Place another Floor Block below that, and then place three Cliff Blocks in a row below that. Follow that with a Floor Block below that, then a Cliff Block below that and a final Floor Block below that; the last Floor Block should wind up in the lower right-hand corner of the Barn if you've built it correctly.
- Move back up to where you placed the second top-most Floor Block along the right-hand side of the screen, and place another Floor Block one square below and to the left of that Floor Block. Put a Cliff Block to the left of the Floor Block you just placed, and then put another Cliff Block just below that same Floor Block. Place another Floor Block below this second Cliff Block, and then put another Cliff Block to the left of this Floor Block. Look at the diagram if this procedure is confusing for the intended pattern here.
- Go to the Cliff Blocks along the left wall of the Barn, between the Door leading into the House and the one leading outside. Place a Cliff Block one square below and to the right of the Door leading into the House, place a Cliff Block below it, a Floor Block below it and a Cliff Block below that (this one should be one square above and to the right of the Door leading outside. Put another Cliff Block to the right of this Floor Block, then your last Floor Block to the right of that. Place your last three Cliff Blocks one square above, one square to the right, and one square below this final Floor Block.
- With the rest of the work complete, purchase your Feeders and Troughs if you haven't done so already. Place five of the Troughs immediately below of the Floor Blocks you placed in the upper left-hand corner of the Barn, and place the other four immediately above the Floor Blocks in the lower left-hand corner (you'll move your existing Trough down here once you've moved your Sheep into the Barn, which is coming up soon.
- Place two Feeders in a row immediately to the left of each of the four Floor Blocks along the right-hand wall (eight feeders total). Finally, Craft a fourth Chest if you need to, and place it to the right of the Cliff Block immediately to the right of the Floor Blocks in the upper left-hand corner (if you crafted the 21st Floor Block, be sure to put it down before you put this Chest into position). This will finish out the basic layout of the Barn.
Moving the Sheep[]
Before you call well and truly call your Barn complete, you're going to need to move the elements to maintain your animals from the Sod House into the Sod Barn and you'll need to move your existing Sheep in there. Here's how you go about doing that:
- Replace the Cliff Block post immediately to the east of the of the upper left-hand corner of the barn with a Dirt Block. Alternatively, just don't place a Cliff Block there to begin with. DO NOT Hammer the Cliff Block - you'll take out the Roof Block overhead if you do.
- Standing on the Floor Block in the upper left-hand corner of the barn, replace the Cliff Block immediately to the left (the one in the upper right-hand corner of the House, where your Sheep is currently penned up) with a Dirt Block. This will "knock a hole" in the wall. Again, DO NOT Hammer it out.
- Put the first of those Cliff Blocks back where it was. Make sure you're standing south of where it goes so you don't accidentally hem yourself in accidentally. If you do, you should be able to work it out okay; the Sheep isn't getting around you.
- Hammer out the Trough on the west side of your existing Sheep pen (the one inside the House), and then immediately (before the Sheep has a chance to escape) move up to the Sheep and try to walk into it. You should be able to push it into its new pen if it hasn't already gone in there voluntarily. The Trough should be empty before you attempt to do this, otherwise you'll lose any Hay that's already in it.
- With the Sheep now inside the Barn, put the second Cliff Block (the one that was originally part of your House) back where it was originally. Again you'll want to be to the left of where it goes so you don't hem yourself in. If you do hem yourself in, you can Hammer out one of the Troughs to escape, but you'll need to be quick about putting it back into position so that the Sheep doesn't get loose.
- Congratulations, you no longer have to sleep in the same room as your livestock. Go ahead and place the last Trough where it needs to go in the lower left-hand corner of the Barn, and then feel free to move around your Anvil, Tinker Table, Clock and Calendar (if you have them) so that you can free up a little bit of space to move around in your House. Or do whatever you like there - it's your Farm, after all...
Your new Sod barn will easily house all eighteen of the animals (Five Sheep, Five Cow and Eight Chicken) required to collect most of the achievements in the Second, Third and Fifth Columns of the Progress Journal, and puts you in a good position to get the few that it doesn't grant you outright (such as getting Gold Milk, Wool and Eggs). A fair amount of the internal space remains available for weed-whacking, and once you've paid off your debt, you can make the decision on your own whether or not to leave the floor as bare dirt or go ahead and replace it with something that won't pop a weed up somewhere inconvenient on a busy day. Since it's connected to your bedroom, your new Barn is technically large enough to fulfill the "Build a Mansion" achievement in the Progress Journal - alas that you can't earn that one until you've bought the largest-sized farm, and if you're rich enough to do that, you might as well spend some money to swap out the Cliff Blocks for something nicer. That said, when you do buy larger farms, you shouldn't have to add to the size of the barn - or build any other buildings on your land for that matter.
Building the Canteen[]
BEGIN EDITING HERE.
And now I come to the part that I need to think about in terms of organization, or think about ditching entirely. First things first - get it all into one editable section.
The Door Defense[]
If the wildlife on a particular screen is giving you trouble while you're trying to hammer out some ore, one thing you might consider is what I call the "Door Defense" (otherwise known as the Mineshaft technique). For this defense, you'll need a Door - you might consider taking out the one between your bedroom and the barn, or you could simply fashion an extra Door with the Wood you're harvesting on a daily basis. A Gate will work just as well - as long as it's something you can open and shut at will.
To employ the defense, begin hammering out a "shaft" in a face of cliff blocks with ore deposits nearby. Make this shaft two or three squares deep. Then, simply put the door/gate in the first block, the one adjacent to the outside. That's all there is to it; you can now hollow the inside of the Cliff face out to your heart's content without being harrassed by the local fauna. Just be careful about leaving
Increasing Storage[]
Jumbo Packs and Chests, and the Three-Pack Strategy
Fiber Farming[]
Growing radishes get you chances for fiber every 5 days (mushrooms also do 5 days but might not drop fibers)
Other Basic Tools[]
Paying the Debt and Expanding: Ideas for the Later Game[]
There is no need to pay off the debt until you need a farm expansion... So no hurry XD.